
Changing guitar strings can be one of the most confusing endeavors for any guitarist. No matter how old or how experienced, just about every guitar player out there has been met with a broken string. In this guide, we will go through the step-by-step process to change the strings on an acoustic guitar. By the end of this post, you will have the tools necessary to try restringing an acoustic guitar on your own! Not in the mood to read? Watch the video below to guide you!
Things You'll Need
Before you begin, gather all the items you'll need. In order to restring your guitar, you'll need the following:
- A guitar
- A pack of new strings (I like to use D'Addario EJ16)
- Scissors or wire cutters
- Wood polish
- Paper Towels
- Pliers
- A guitar tuner
Some of these items are not completely necessary, for example, wood polish and paper towels are only necessary if you plan to clean your guitar while the strings are off.
Once you've gathered your materials, find a flat surface to lay the guitar down on.
Step 1 - Detune Old Strings
In this tutorial, we will be replacing all the strings on the guitar. Many guitarists who break one string use the opportunity to change all the strings. Many professional guitarists and regular players will even change strings before breaking any. If a guitarist perceives the strings going out of tune quickly or sounding out of tune despite being in tune with a tuner or even just feeling "old", they will often replace the strings. As you play guitar, residue builds up on the strings over time, you can check if your strings have any residue by running your finger on the underside of a string, you'll likely feel it as you move your finger and see the residue on your finger when you look at your hand afterwards.
Begin detuning any strings you wish to change, do this by loosening the tuning key of the corresponding string until the string has virtually no tension and hangs loosely on the fretboard.
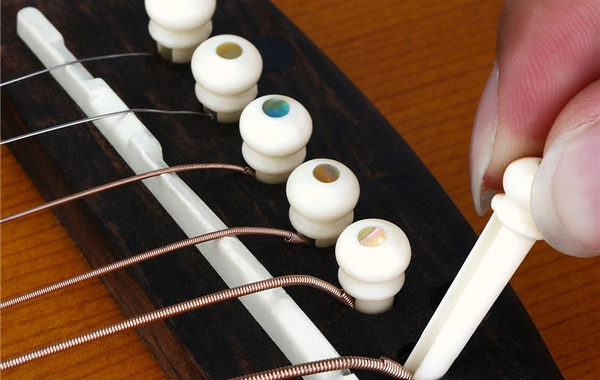
Step 2 - Remove Bridge Pins & Strings
The bridge pins are the small pegs in the bridge. You may not have known that they were even removable but they are actually keeping your strings in place.

First, make sure your strings are loose enough to fit your hand in the sound hole. Then reach in the guitar, feel around for where the bridge pins are located and push the bridge pins up and out of the guitar.
You may be able to pull them from the outside but they tend to be tightly in place. If you encounter a bridge pin that feels stuck, either use pliers or attempt to use 2 hands, one from the inside of the guitar pushing up, and one on the outside pulling up. If you need to use pliers be careful not to damage the guitar or the bridge pins.
Keep the bridge pins handy as we will need those later.
Now back to the headstock, you can begin unwinding each string from it's tuning key and remove each from the guitar entirely.
If you're having trouble removing a string, use pliers to pull the string out.
Step 3 - Clean The Fretboard (Optional)
As mentioned earlier, this step it optional. I generally recommend cleaning the fretboard every time you change the strings as it is one of the few opportunities you have to access areas of the guitar that are normally blocked by the strings. You can usually see residue build up on the fingerboard if you look closely at the guitar. If any residue is visible on any of the frets, it's a good idea to polish it.
First, grab a sheet of paper towel and fold it in half several times to make a small square or rectangle. Dab the folded paper towel on the lid of the wood polish (I use Old English Wood Furniture Polish) and flip the bottle upside down. Quickly return it to the upright position so the paper towel gets a small amount of the polish soaked in.
Scrub the fingerboard, one fret at a time, moving with the direction of the grain of the wood. Give special attention to areas where build up is visible. You will quickly see the residue starting to build up on the paper towel. Feel free to reapply polish as you go, flip the paper towel to a clean side or switch to a fresh sheet altogether.
Once the fretboard is taken care of, you can use a small amount of polish to clean any other areas of the guitar that may be hard to reach normally. Dust will commonly build up on the headstock and around the bridge, these are areas that the strings usually prevent us from being able to clean.
Step 4 - Restring The Guitar
Guitar strings often come wound together in their packaging. This can potentially make it confusing to figure out which string is which. Luckily most string manufacturers have a way to help; many brands (including the D'Addario strings I use in the video) have a color guide. The ball at the end of each string will have a different color and a color guide will be included somewhere on the packaging. For my strings, the color guide is:
String 1 (E) = Silver
String 2 (B) = Purple
String 3 (G) = Green
String 4 (D) = Black
String 5 (A) = Red
String 6 (E) = Gold
*This color guide may vary or not be present at all depending on the brand.
The process will be essentially the same for each string.
- Place the ball end of the string in the corresponding hole in the bridge.
- Push the bridge pin in while pulling the ball end of the string against it to ensure it is secure.
- Thread the string through the hole in the corresponding tuning key.
- Pull the string so it is tight, it doesn't need to stay completely taught but try to avoid a lot of excess string hanging on the fretboard.
- For thinner strings (Strings 1, 2, 3, and 4) you can wrap the string around and thread through the tuning key hole a second time. For the 5th and 6th strings, instead of threading the string a second time (they are too thick), tie the string like a pretzel knot and pull it tightly, like this.
- Start to tighten the tuning key, you should always pull the string towards the inside of the headstock, NOT towards the outside. See this segment of the video if this is confusing.
- There's no need to tune the string completely yet, we will save that step for the end to give the strings time to stretch. Attempting to completely tune the strings immediately is a common way guitarists break their brand new strings.
Once all the strings have been attached then you can being to tighten them. Again, don't worry about tuning just yet. We just want to begin to stretch the strings so they don't break while tuning for the first time.
Now that all the strings are generally taught and not touching the fingerboard, you can manually stretch each string out by hooking your finger underneath each string one at a time, gently lifting the string, then sliding your finger up and down the length of the string. Use your other hand to hold the string in place at the nut.
Step 5 - Tune Each String
Grab your tuner, I use a smartphone/tablet app, and begin tuning each string to the correct pitch. New strings tend to lose their tune quickly in the beginning. Don't worry, this is completely normal. It may take 5-10 tunings before the strings really start to hold their tune. I will usually tune all my strings twice in a row once I change them, then I'll play a little bit and tune them again after 5 minutes or so.
Once your strings are in tune, grab your scissors (they should be pretty heavy duty as strings are made of metal). If you don't have powerful scissors, wire cutters or nail clippers will also suffice. Use your tool of choice to cut the excess strings down so they are no longer flying all around.
You're Ready To Play!
Hopefully you are able to follow this guide without any issues! The first few times I attempted to change my strings, several things went wrong. I broke strings, turned them the wrong way, and I even accidentally put a string in the wrong place! Mistakes happen and are simply a part of the journey so try not to get too frustrated and take any mistake as an opportunity to learn.
If you're having A LOT of trouble with changing your strings, you can contact us for a video consultation or if you are in the Philly/South Jersey area you can schedule a time to stop by our studio.
Thanks for reading and good luck!